
 Image credit: Getty Images from Unsplash
 |
Elizabeth is the founder of Central Coast Painting Conservation, LLC and has over a decade of experience in the conservation and preventive care of 19th-century to contemporary paintings.She has treated paintings by artists like David Hockney, Ed Ruscha,
|
Master the basics of condition assessment photography with these 12 essential steps.
Whether your painting was damaged by an earthquake, flood, mudslide, or fire, proper photography is key to documenting its condition and communicating effectively with your insurance adjuster, registrar, collections manager, or conservator.
Lighting, angles, and appropriate handling can preserve evidence and help conservators determine the urgency of intervention. The latter is especially important after disasters that have impacted many others in your area; local conservators will be working overtime and must prioritize objects that are actively deteriorating.
As a paintings and preventive conservator in California, I have documented many paintings damaged during natural disasters.
Below are 12 steps for properly photographing paintings so that you can create a thorough visual record while minimizing further harm. To make this process as approachable as possible, all of the following photos were taken with an iPhone and with items all collectors and institutions would have on hand.
1. Create a shot list before photographing
To help you stay organized, create a shot list before photographing. You want to capture every part of the painting (recto, verso, tacking edges, corners, frame, hanging hardware, backing board, key slots, behind stretcher bars, etc.), even if you do not notice damage in those areas.
A sample shot list for a stretched painting on canvas might include:
-
Recto (front)
-
Full image shot in soft natural light
-
Full image shot in raking light from the right
-
Full image shot in raking light from the left
-
Close-up of each quadrant
-
Close-up of each corner
-
Close-up of 4 fold lines
-
Detail of any obvious damage
-
Shot from the side to communicate any warping of stretcher bars or undulations in canvas
-
-
Verso (back)
-
Full image shot
-
Close-up of each quadrant
-
Angled photo between stretcher member and canvas
-
Close-up of hanging hardware
-
Close-up of any canvas folded over from the recto
-
Detail of any labels and/or inscriptions
-
-
Edges
-
All 4 tacking edges
-
Detail of tacks and/or staples, with special attention paid to any rusting, raised, broken, or missing
-
 Image credit: Elizabeth Burton
2. Take care when moving the painting
Before moving the painting, assess its stability—especially if it fell from the wall during an earthquake or was partially covered by mud in a landslide. Never assume the frame, stretcher, or strainer is structurally sound—particularly if it has been exposed to heat, moisture, or physical impact. Frames with plaster moldings, for example, may weaken when subjected to high heat and/or moisture.
Move the painting slowly to avoid jostling the canvas unduly. If the canvas is waterlogged, it may sag or pull away from the stretcher. Mud or debris collected along the bottom stretcher bar can further strain the paint and ground layers. Any sudden movement risks additional damage.
If the painting’s primary support is a panel like Masonite or plywood, check for warping, delamination, or softening of the board as moisture exposure can cause structural instability. Handle with extra care to prevent further bending or breakage. If unframed, you might also consider placing the painting on a rigid board that allows you to move it more carefully.
If any paint separates from the image area, collect the fragments carefully. Place them in a plain white paper envelope or a lidded dish—never a plastic bag, as trapped moisture could affect them. If possible, note the location from which each piece fell. Do the same with any labels that have detached.

3. Avoid wearing cloth gloves
This might be controversial, but avoid wearing cloth gloves that could catch on tacks, framing nails, hanging hardware, flaking paint, gilding, plaster, or other compromised areas of the painting.
If you feel that gloves are necessary (e.g., to protect your skin from mold exposure), use well-fitted nitrile or latex gloves that won’t snag.
When you move the painting, do not touch the image area or the verso if its primary support is canvas. Limit handling to the frame and/or stretcher.
4. Don’t manipulate the painting
As owner or steward of the painting, do not try to remove it from its frame, pull off any labels, or otherwise manipulate it. We typically recommend against trying to remove the backing board before consulting a conservator because it might not separate cleanly. Unscrewing the screws that secure the backing board to the stretcher or strainer could also jostle the painting and cause further damage.
If you work with a conservator, they will remove the painting from its frame, detach the backing board, encapsulate labels, and clear away any mud, soot, or ash.
 Seen here is paint loss and a depression caused by frontal impact. Image credit: Elizabeth Burton
5. Always locate and measure damage from the same reference point
In detail photos, it can often be difficult to determine the exact size and placement of damage without a standardized method of reference. If measuring and/or locating damage as you assess the painting, always use the same reference point (e.g., lower right corner or lower left corner) in your notes.
6. Photograph before and after handling
Examine the painting carefully before moving it. If you must pick up or reposition the painting, take photos beforehand and afterward to document any changes in condition that might occur during handling.
Artwork Archive Tip:
Upload your photographs to the artworks' object record within Artwork Archive so that the photographs are accessible with other key details for insurance like appraisals and artwork values.
If you have an Artwork Archive Organization account, you can attach the photographs to the maintenance record associated with the damage.
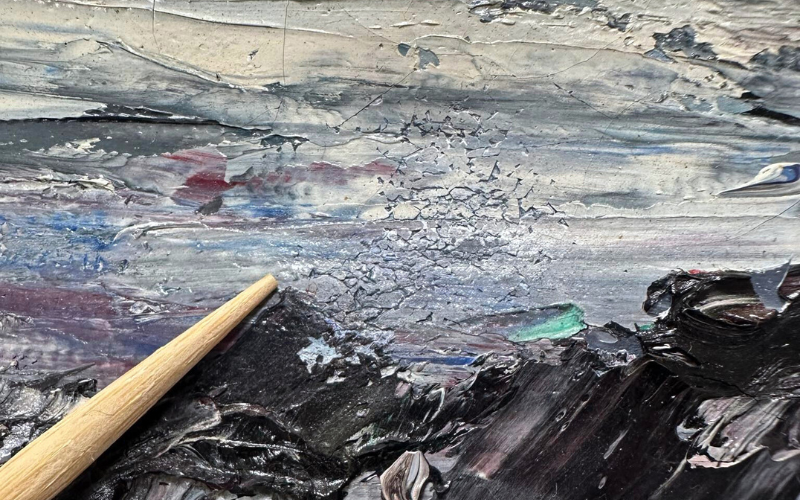
7. Photograph every part of the painting
When it’s time to photograph, be sure to capture every part of the painting by referring back to your shot list. Capture the recto (front), verso (back), tacking edges, corners, and all areas of concern. Place the painting against a white or neutral background if possible (we often use foam-core/archival foam board).
Use a wooden skewer or similar pointer to help your camera focus on detail shots. The skewer is especially helpful when there is a high-gloss coating. The painting pictured below has a heavy smoke and dust layer as well as a variable gloss coating. Both make photographing fine details more difficult.
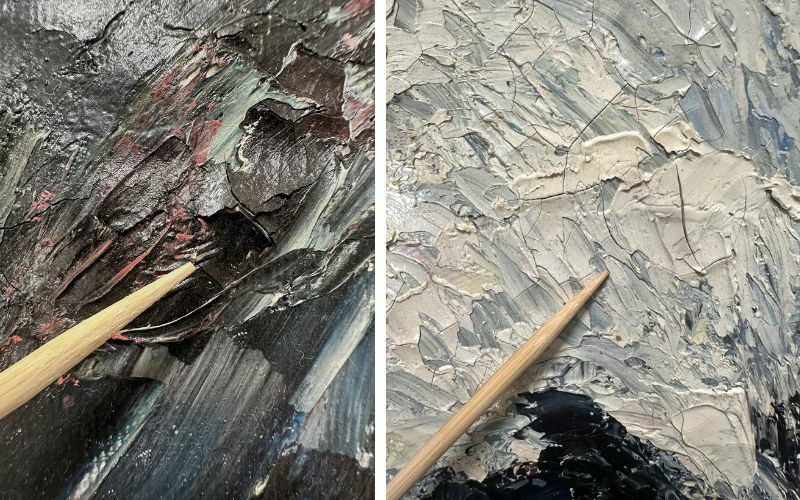 Image credit: Elizabeth Burton
8. Photograph in raking and direct light
To capture your painting’s condition as accurately and thoroughly as possible, photograph in both raking and direct diffused light without using flash.
What is raking light? It is a technique often used for photographing paintings that involves shining light at an angle across a surface to reveal details that are otherwise difficult to see.
Even light will help show color shifts, paint loss, and tonality changes without harsh shadows. If using lights, angle them to avoid glare from varnish or glazing.
You might also consider photographing the painting from above while placed on a board and face to face on an easel. For example, the photo below was taken in direct, diffused light on an easel, but the frame still casts a shadow on the upper perimeter of the painting.
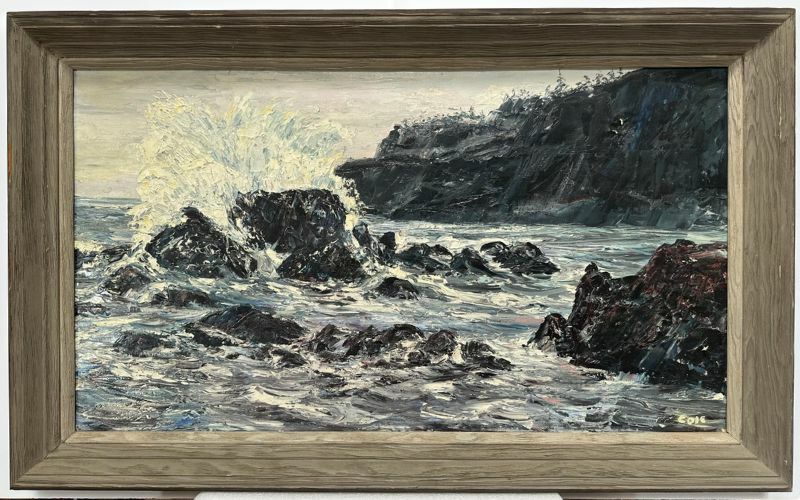 Image credit: Elizabeth Burton
9. Take videos if necessary
Many condition issues are poorly captured by still photography alone. A photo might not capture canvas sagging, lifting paint, or variations in gloss. Take videos if you feel that the images do not capture the damage well enough.
Artwork Archive Tip:
Did you know that you can attach video files to your Artwork Archive artwork records? Learn more about adding media here.
10. Label files clearly and consistently
You might take dozens of photos of your painting. Many will be detailed images that are difficult to place without context. Use the location and type of damage in each filename (e.g., “SmithPortrait_UL_Cracking.jpg”) so they’re easy to track and make sense to your adjustor or conservator.
11. Do not edit your photos
Avoid filters or retouching that could obscure or visually dramatize damage. Basic white balance or minor exposure correction (for accuracy) might be okay, but keep it minimal.
12. When in doubt, work with a professional
Involve your insurance adjustor to ensure that you are fulfilling all documentation requirements and to clarify any claim information. Seek guidance from a conservator to minimize further damage, interpret complex or difficult-to-identify condition issues, schedule a professional examination, or plan any necessary treatments.


